
Introduction: In today’s software development landscape, automating tests is crucial for ensuring continuous quality. Among the many tools available, Playwright stands out as a robust and flexible testing framework that supports multiple browsers with a single API. Combined with Visual Studio Code (VS Code), Playwright becomes even easier to manage, write, and debug tests. This guide will walk you through the steps to install Playwright, set up Visual Studio Code with the Playwright extension, and create your first test.
1. Installing Node.js
Before you install Playwright, you need to ensure that Node.js is installed on your system. Node.js allows you to run JavaScript code outside of the browser and provides npm, a package manager to install libraries like Playwright.
- Step 1: Visit the official Node.js website and download the latest version for your operating system.
- Step 2: Run the installer, following the default settings to ensure
npm(Node Package Manager) is included. - Step 3: Verify the installation by opening your terminal (or command prompt) and running the following command:
node -vYou can also check the npm version:npm -v
2. Installing Git
Git is essential for version control. It lets you track changes and collaborate with others if needed.
- Step 1: Go to git-scm.com and download Git.
- Step 2: Install Git by following the on-screen instructions.
- Step 3: To verify the installation, open your terminal or command prompt and type:
git --version
3. Setting Up Visual Studio Code
Now that Node.js and Git are installed, it’s time to set up Visual Studio Code, an ideal IDE for writing and managing Playwright tests.
- Step 1: Download Visual Studio Code from code.visualstudio.com.
- Step 2: Install VS Code by following the on-screen instructions.
- Step 3: Launch VS Code, and you are ready to start installing the Playwright extension.
4. Installing the Playwright Extension for VS Code
The Playwright Test for VS Code extension simplifies the process of writing, running, and debugging Playwright tests.
- Step 1: Open Visual Studio Code.
- Step 2: Click on the Extensions icon in the sidebar (or press
Ctrl+Shift+X). - Step 3: In the Extensions Marketplace, search for Playwright and install the official Playwright Test for VS Code extension.
The extension enhances your workflow by providing features like syntax highlighting, test running, and debugging.
5. Setting Up Your Playwright Project
Once your environment is ready, the next step is to set up Playwright for your project.
- Step 1: Open the terminal inside VS Code (press `Ctrl+“).
- Step 2: Navigate to the directory where you want to set up your project, or create a new folder:
mkdir playwright-demo
cd playwright-demo
- Step 3: Initialize the Node.js project by running the following command:
npm init -y
This will create a package.json file, which holds your project’s metadata and dependencies.
- Step 4: Install Playwright by running the following command:
npm init playwright@latest
This command will initialize Playwright in your project. You’ll be prompted with configuration options, such as choosing between TypeScript and JavaScript, where to store your tests, and whether to install the required browsers.
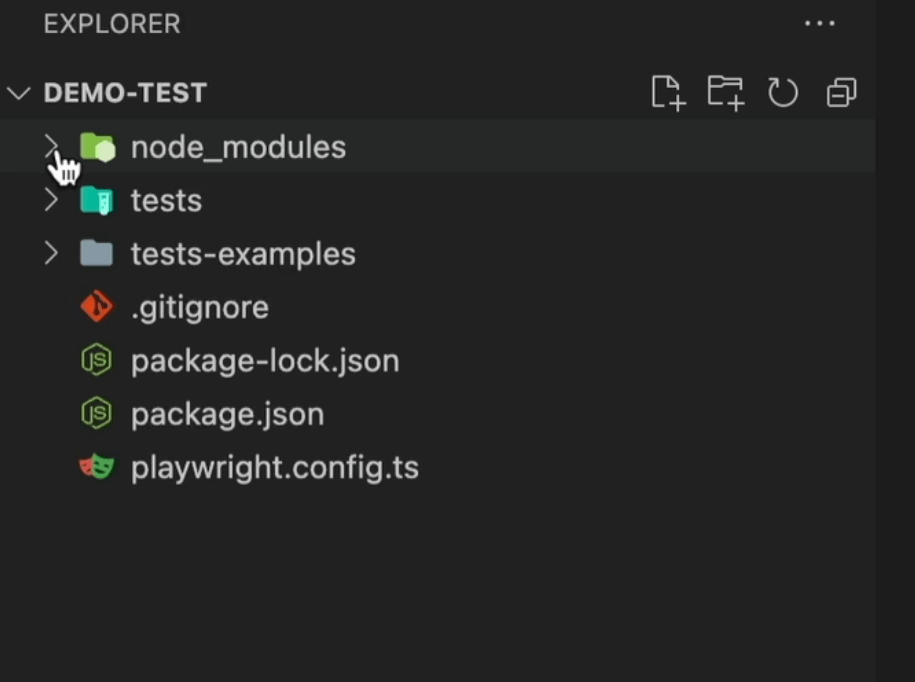
6. Understanding Playwright Project Structure
After initialization, your project will have the following structure:
node_modules/Folder: Contains the dependencies installed via npm.tests/Folder: This is where Playwright stores your test scripts.tests-examples/Folder: Contains example tests that demonstrate how to write and run Playwright tests..gitignoreFile: Specifies files and folders Git should ignore (e.g.,node_modules/).package.jsonFile: Holds metadata about your project and dependencies.playwright.config.tsFile: The configuration file for Playwright, where you can define global settings for your tests, such as which browsers to use, timeouts, retries, etc.
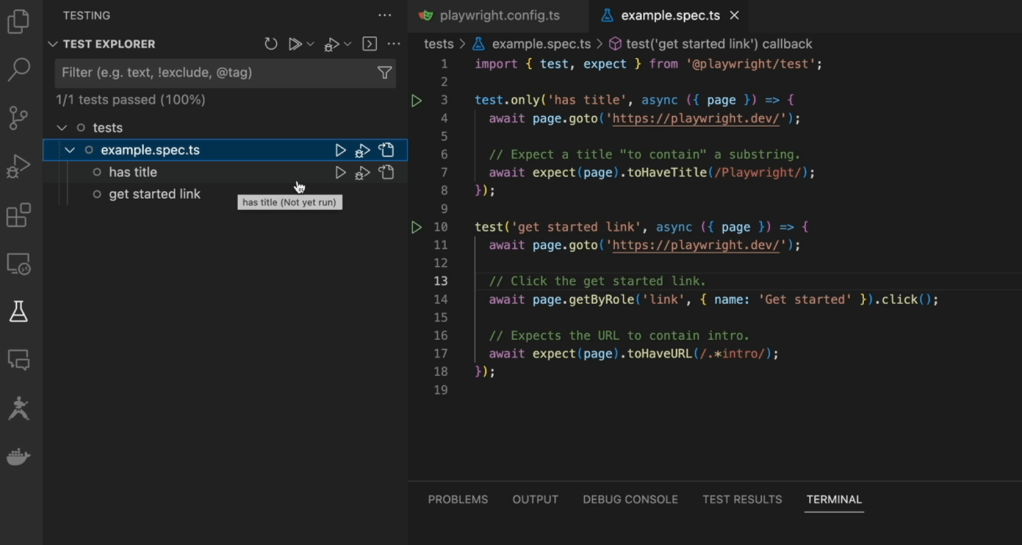
7. Understanding the Pre-Included Playwright Example Test
When you initialize Playwright in your project, it comes with an example test file (example.spec.ts) to help you get started quickly. This file includes sample test cases that demonstrate how to use Playwright’s API to interact with web pages and verify elements.
Here’s a look at the pre-included tests:
import { test, expect } from '@playwright/test';

test('has title', async ({ page }) => {
  await page.goto('https://playwright.dev/');
  await expect(page).toHaveTitle(/Playwright/);
});

test('get started link', async ({ page }) => {
  await page.goto('https://playwright.dev/');
  await page.getByRole('link', { name: 'Get started' }).click();
  await expect(page).toHaveURL(/.*intro/);
});
- Test 1:
'has title'checks that the Playwright website’s title contains the word “Playwright.” - Test 2:
'get started link'verifies that the “Get Started” link on the homepage works and leads to the correct URL.
8. Running Your First Test from the Terminal
To run the test from the terminal, use the following command:
npx playwright test
This command will run all the tests inside the tests/ folder in headless mode by default.
9. Running Tests from the VS Code Test Explorer UI
Visual Studio Code provides a Test Explorer UI, where you can easily run tests without using the terminal.
Steps to Run a Test from the Test Explorer:
- Click the beaker icon on the left sidebar (labeled Testing) to open the Test Explorer.
- Click the play button next to the test file (e.g.,
example.spec.ts) to run all tests in that file. - Alternatively, click the play button next to individual test cases to run specific tests.
10. Running Tests in Specific Browsers from the Test Explorer UI
You can also select which browser to run your tests in directly from the Test Explorer UI.
Steps to Select a Browser:
- In the Test Explorer panel, click the browser dropdown at the top (next to the play button).
- Choose from the available browsers: Chromium, Firefox, or WebKit.
- After selecting a browser, click the play button for the test or test file, and it will execute in the chosen browser.

11. Running Tests Terminal general commands:
For running a test in headless mode:
npx playwright test
To show a full report in a html page:
npx playwright show-report
If you want to run a test with a specific browser (headless)
npx playwright test –project=chromium
With head ( we can see the execution):
npx playwright test –project=chromium –headed
The command to execute just one file test
npx playwright test example.spec.ts –project=chromium
The command to run just one test from your test file
npx playwright test -g “has title” –project=chromium
The command to run the test with trace on
npx playwright test –project=chromium –trace on
The command to run the test with debugger on
npx playwright test –project=chromium –debug
12. Viewing Test Reports
Playwright generates detailed HTML reports by default. After running your tests, you can view them by using the following command:
npx playwright show-report
This opens an HTML report in your browser, displaying details such as which tests passed or failed, logs, screenshots, and execution times.
13. Ignoring and Running Specific Tests
- Skipping a Test:If you want to skip a test and not run it, use
test.skip:test.skip('this test will be skipped', async ({ page }) => { await page.goto('https://playwright.dev/'); }); - Running Only One Test:To run only one test and ignore the rest, use
test.only('this is the only test that will run', async ({ page }) => { await page.goto('https://playwright.dev/'); });
14. Running Tests in UI Mode
Playwright provides a useful UI mode that allows you to run and debug tests interactively:
npx playwright test --ui
In this mode, you can easily select and run individual tests, view test results, and debug your tests interactively.

Conclusion
Setting up Playwright with Visual Studio Code is incredibly straightforward, even for those new to automated testing. From the initial setup to writing your first test, Playwright’s simplicity and intuitive design make it easy to get started. The pre-included example tests provide a helpful introduction to the framework, allowing you to quickly understand how to navigate pages, interact with elements, and validate your web application’s behavior.
Learning to write tests with Playwright is equally accessible. Its clear, concise syntax combined with powerful features like cross-browser testing, headless execution, and debugging tools means you can start creating robust tests in no time. Whether you’re running tests from the terminal or using the Test Explorer UI in VS Code, the process is seamless and user-friendly.
Playwright’s flexibility extends beyond basic tests, giving you the tools to grow your skills as you begin exploring more advanced features like mobile testing, network interception, and integration with CI pipelines. The ease of setup and rapid learning curve makes Playwright the perfect choice for anyone looking to enhance their testing capabilities with minimal hassle.


Leave a comment